Do you want to add a unique touch to your garments? Do you want to make your clothes but don’t know how? If so, this blog post is especially for you! This post will show you how to stitch a seam using an invisible zipper. With our step-by-step instructions, you’ll be able to make any garment look professional in no time.
Steps on how to stitch a seam using an invisible zipper
This short, straightforward tutorial will walk you through adding a zipper fly to pants or jeans. Proceed in the following manner:
Prepare the Fabric for the Seam
Before stitching a seam with an invisible zipper, you must prepare the fabric. Start by measuring and marking the seam allowance on both sides of the zipper opening. It will make it easier to keep your stitching even and consistent.
Next, finish the raw edges of your seam allowances with a method such as overlocking or zig-zag stitching. It is will help prevent fraying and give your seams a neat, professional finish. Finally, press both sides of the seam open to flatten any creases or folds in the fabric. Once you’ve done this, you’re ready to start stitching!
Always position the invisible zipper centered between the left and right seam.
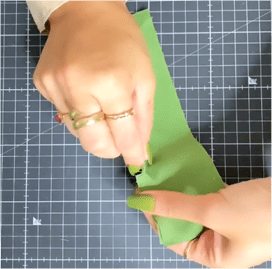
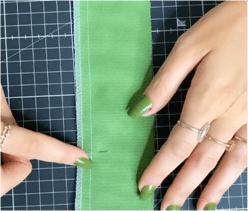
Overlap the seam together
Carefully overlap the left and right seams together. Mark the seams at a distance of 4 centimeters from the bottom.
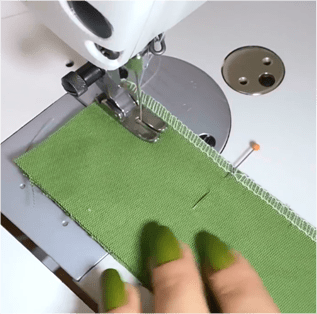
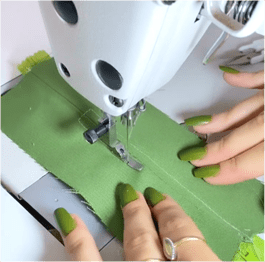
Start Stitching
Make a mark with a pin in the location we marked in the step before this.
Begin stitching up to the pin.

Change the sewing preset
You must adjust the stitching preset to number 5, as demonstrated in the figure.
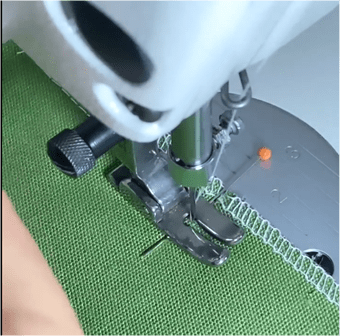
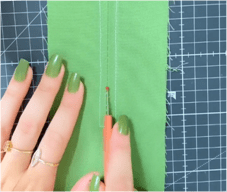
Continue stitch from the pin
After adjusting the settings for the sewing machine, continue stitching from the pin to the end of the seam.
See the Difference
The difference between the two stitching presets is crystal clear to notice.
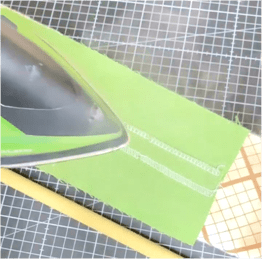
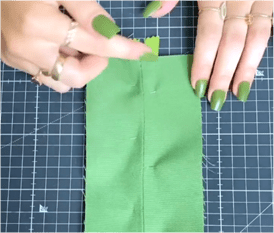
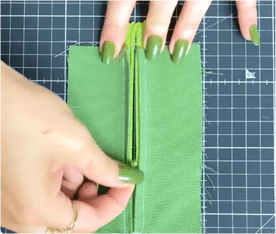
Open and Iron the Seam
At this point, you will need to open the seam that you just stitched together and iron it through.
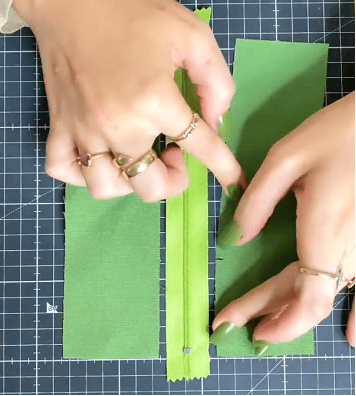
Place the zipper in the middle
Position the zipper so the slider is pointing down and in the middle of the seam.
Pin the Zipper
It would help if you use sewing pins to attach the zipper to the seam.
Stitch the Zipper
With the slider pointing down, sew the zipper to the seam from the front. The zipper should stitch, as shown in the picture.
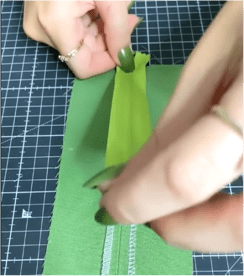
Finishing touches
You can cut the middle seam to reveal the recently stitched invisible zip.
Congratulations
Incredibly, you were able to successfully stitch a seam using an invisible zipper following the instructions in this guide.
We are delighted to congratulate you on your success.
Invisible zippers are a great way to add a neat, professional finishing touch to any garment. We sincerely hope that you found this training enjoyable and helpful. Why not give stitch a seam using an invisible seam a shot now that you know how to do it quickly and easily? With practice and patience, you’ll be able to create beautifully tight stitching lines, making your seams look professional and polished!
If you have any inquiries or comments, please do not hesitate to submit them in the comment section below.
Frequently Asked Questions
What is the seam allowance for an invisible zipper?
When sewing an invisible zipper, it is essential to use the correct seam allowance. The majority of clothing patterns specify a 5/8″ seam allowance. Which is marked with chalk or a fabric marker. Refer to the manual for your specific machine model for information on connecting the zipper foot.
After marking a 58″ vertical seam allowance on both edges of the fabric, sew the pieces together. You can prepare the zipper by ironing it and cutting the interfacing about an inch wide or enough to cover the zipper teeth. When lined up correctly, the edge of the zipper should give you a 3/8” seam when sewn. This technique will provide support and help prevent the stretching of the fabric.
Can an invisible zipper be sewn in like a regular zipper?
Yes, You can sew an invisible zipper like a regular zipper. With the help of a standard zipper foot and a straight stitch, you can sew the zipper to the fabric. Before sewing, prepare the seam edges for a clean finish. An adjustable zipper foot is also available for invisible zippers that allow you to flatten the zipper teeth as you sew just in front of them. It will give your garment a professional look with no visible stitches on the face of it. Invisible zippers are a great way to elevate your sewing projects and give them a polished look.
How do you sew an invisible zipper with a regular foot?
Installing an invisible zipper with a regular foot is an easy task that can elevate your sewing projects. Before you begin, ensure the right tools: a standard zipper foot, fabric marker or pins, ruler, and tape. Once you have those items in hand, start by opening the zipper down and placing the end about 0.5 cm from the presser foot. Make a mark on the zipper where the needle is, then position the zipper teeth underneath the right groove of the foot.
Begin to sew from the top edge, ensuring your zipper coils are flat as you stitch from the top down in the gap behind the zipper teeth while holding it open with your hand. Back-stitch when reaching the bottom of the zipper. Then switch your needle or your zipper foot to the other side and sew down the other side of the zipper in precisely the same way. Once finished stitching both sides of the zipper, backstitch at either end to secure them in place, and voila! You have successfully installed an invisible zipper with a regular foot!
What does an invisible zipper foot look like for a sewing machine?
An invisible zipper foot is a specialty sewing machine foot designed to help you create the perfect hidden closure for your garments and home décor items. It looks like a regular zipper foot but has two grooves on the underside to accommodate the coils of an invisible zipper. The needle should be placed as close to the fastener to create a seamless transition. You can achieve a professional finish with minimal effort with an invisible zipper foot.
How do you blind stitch a seam?
Hand sewing can be a great way to create a professional-looking finish on your projects. One of the most popular types of invisible hand stitches is called a blind stitch, also known as a slip stitch or hidden stitch. This type of stitch is used to sew two pieces of fabric together with no visible stitching from the outside. To make a blind stitch, fold and pin the edges of the fabric together, then begin sewing tiny stitches in the inside fold of the material. Make sure to keep all your stitches small, even for an invisible seam. Once you’ve finished all your stitches, tie off your thread securely at the end and snip any excess thread away. With practice, you’ll soon be able to create beautiful, nearly invisible seams with this helpful technique!
What is an invisible ladder stitch in sewing?
An invisible ladder stitch is a type of hand-sewing technique used to create an invisible seam. It’s also known as a slip stitch, hidden stitch, or blind hem stitch, and it is commonly used to close gaps in seams or for stuffed toys, pillows, and other projects that require an open seam for turning or pressing. This technique is easy to master and perfect for creating an aesthetically pleasing finish to any project. To sew this stitch, thread your needle, secure the thread in the seam allowance, and make tiny stitches across the gap until it’s closed. Make sure you pull the thread tight after every few stitches to ensure the seam looks neat once complete. With practice, you’ll be making beautiful invisible seams in no time!
How do you cut an invisible zipper?
Cutting an invisible zipper is easy with suitable materials and techniques. To begin, measure the zipper length needed for your project, leaving 1cm from the top of the garment. Next, trim off the excess zipper length from the bottom, making sure to use pinking shears to prevent it from fraying. Finally, sew in place using a needle, thread, or a sewing machine. Be sure to test the zipper before completing your project, as there is no way to undo this step once it’s done. With patience and practice, you’ll master cutting an invisible zipper like a pro!
What does an invisible zipper look like?
An invisible zipper is a type of closure that blends seamlessly into the fabric of a garment. It is made of two sides with teeth that interlock when closed, which makes it nearly undetectable from the outside. When open, the zipper appears as an unnoticeable line running along the garment seam. The beauty of the invisible zipper is that it allows garments to have a sleek and polished look without any extra stitching or hardware visible from the outside.