Do you need to sew a shirt sleeve slit but don’t have the time to do it? Don’t worry, we’ve got you covered! This blog post will demonstrate to you how to quickly sew a shirt sleeve slit in just a few easy steps. So grab your sewing supplies and get ready – let’s get started!
Gather Your Materials
Gathering the right supplies is an essential first step in sewing a shirt sleeve slit. You will need a sewing machine, thread, scissors, pins and a shirt with a long sleeve. You may also want to have some chalk or fabric marking pencil on hand to help mark the location of your slit. Once your supplies are ready, you can begin preparing the sleeve for your project.
Steps on how to sew a shirt slit
This short, straightforward tutorial will show you how to sew a shirt sleeve for your favorite shirt. Proceed in the following manner:
Measure and Mark the Slit
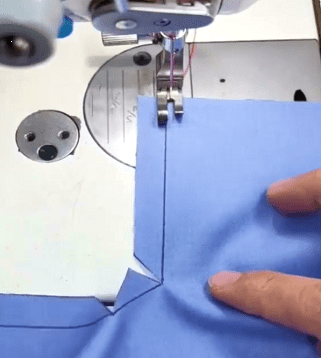
If you want extra style and detail to your shirt, adding a slit to the sleeve is a great way to go. It’s essential to measure and mark the slit correctly to ensure that your cut is even and looks professional,
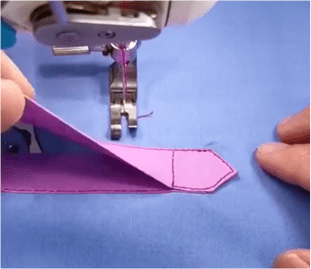
Once you’ve decided on an ideal placement, mark it with a marker or piece of chalk, so it’s easier for you when sewing. If there isn’t one on the fabric already, create a placket location by folding over half an inch of fabric along the top edge of where you want the slit and press down with an iron. It will help keep all your layers together as they are sewn together during this process. Once everything is marked and ready to go, cut through both layers along your marked line. With these steps complete, now it’s time for sewing!
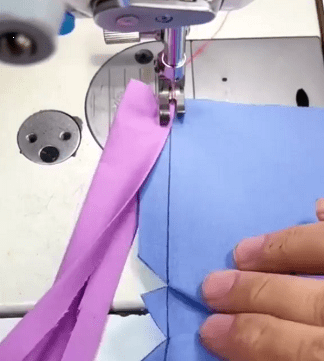
Sew a Straight Stitch Along Both Sides of the Slit
Sewing sleeve slits is a great way to add extra style and texture to any garment. Sewing the slit is very simple and only requires a few steps.
First, you will need to mark the placement of the slit on your fabric. Make sure to measure twice so that it is even on both sides. Once you have marked the location of your slit, use a straight stitch along both sides of the opening.
When sewing around corners, pivot at each corner so that your seam allowance remains consistent throughout; once finished, press open the seams and make sure there are no wrinkles or gaps in your stitching.
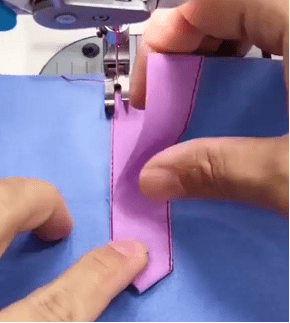
Overlap the slit
Make sure that the slits overlap one another.
If you overlap the slit precisely, the bottom edge should take on the shape of a triangle.
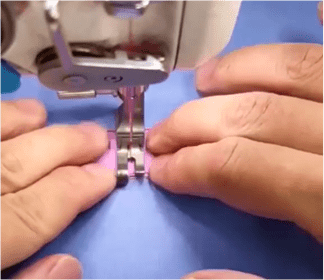
Finishing touches
Finish off by adding a vertical stitch to the triangle area of the slit.
Congratulations
You successfully built a sew-a-shirt sleeve slit by following the instructions in this guide.
We are happy to congratulate you on your success.
Add Decorative Embroidery (optional)
Adding decorative embroidery to your shirt sleeve slit is an easy way to add a touch of style and elegance. Not only will it make the shirt look more fashionable, but it also gives it a unique, individualized look. You can easily embellish your sleeves with simple patterns, such as flowers, stars, or leaves. Embroidery can also create more intricate designs, such as monograms or logos. When adding embroidery to your sleeve slit, use a high-quality thread and a sharp needle for the best results. To ensure the stitches stay in place, use small running stitches that are evenly spaced apart. It will help keep the fabric from bunching up or fraying when wearing the shirt.
Finish with a Hem (optional)
Finishing with a hem is an optional way to complete your sleeve. It requires minimal effort and is a great way to add a clean look to your garment. First, press the seam allowance open on the facing and garment seams when possible. Next, you can use Stitch Witchery or another fusible tape to iron the hem in place. Alternatively, you can also whipstitch it by hand if desired. Lastly, pin along the far right side from the sleeve’s end up to the shirt’s hem, paying close attention to both ends of the seam. This method is much easier than traditional shirt sleeve bound plackets and will give you two ways to finish off your shirt sleeves: with a cuff or hem!
The shirt sleeve slit can be a great way to add style and detail to your garments. It is a relatively easy technique that can be done quickly with minimal supplies. With this video, you should have the knowledge and confidence to sew your shirt sleeve slit! Whether for a dressy occasion or casual everyday wear, this garment detail will stand out in the crowd. Happy sewing!
We sincerely hope that you found this training enjoyable and helpful. Why sew a shirt sleeve slit now that you know how to do it quickly? If you have any inquiries or comments, please do not hesitate to submit them in the comment section below.
Frequently Asked Questions
What are shirt slits called?
A placket is a slit sewn into a garment that offers the wearer more mobility when putting on the garment. Plackets typically have some fastener on their exterior, like a button or a zip.
Plackets are typically located at the neck of shirts and extend down, as well as at the cuffs and extend up the sleeve, in the case of shirts.
Why do shirts have slits on the side?
Specific cuts feature side vents, a split around two inches above the bottom hem. It makes it simpler to tuck in the shirt where it should be. Other versions feature a longer tail in the back that is designed to make it simpler to keep the garment tucked in.
What is a French placket?
It is known as a “French placket,” which refers to a button-front shirt that does not have a separately sewn placket. Instead, the cloth is folded over, and the buttonhole stitching joins the two layers (or three if there is an interlining).
Using this procedure results in an immaculate finish, which is especially beneficial when working with textiles that include densely patterned designs.
What are barrel cuffs?
The barrel cuff is a straightforward alternative, and it is currently the sort of cuff that can be seen on the vast majority of men’s dress shirts.
A solitary band of fabric that has been unfurled wraps around the wearer’s wrist, and the four corners of the cuff are square. It is a choice that is both uncomplicated and effective, yet it still manages to project an air of elegance.
What are the three types of plackets?
The modern man’s shirt can be buttoned with or without a front placket, buttoned with or without a placket, hidden buttons, or a popover. Each of these four plackets serves a particular purpose in constructing a shirt. The dress shirt can be customized to accommodate a variety of settings with the help of each of these laces.
What is a tailored placket?
The purpose of the tailored placket, which is also known as a placket, is often to reinforce and decorate the clothing.
These packets find particular application in men’s clothing, such as shirts, sleeve openings, neck openings, and the like, as well as in children’s clothing.
What is the difference between openings and plackets?
Putting on a facing is the quickest and easiest way to complete a slit. After that, they are having a rounded bottom to the opening, and covering the edge with bias binding is probably the next most straightforward thing to do. Plackets are openings where one side of the opening lies over the other. A little over a century ago, people started using zippers.
What is a seamless placket?
The shirt material must be folded to the reverse side to achieve a seamless placket. There are no visible stitches, but they should be on the reverse.
What is a hidden placket?
If you have never come across a hidden placket before, all it entails is an additional fold of fabric placed on top of the section where the buttonholes are sewn through. This fold effectively conceals the buttons from view.
The result is an uncluttered and straightforward appearance, and if you use our template, you may apply it to any of the three length variations we offer.
What is a popover placket?
Egyptian cotton is used in the weaving of popover shirts, which are woven garments. With 3 or 4 buttons at the top of the shirt. The one-quarter placket stops at the center of the chest. Because the popover lacks a full placket and buttons down the front, it cannot be worn normally; rather, it must be “popped over” the wearer’s head and shoulders to be worn.